
Understanding Shutter Speed and Aperture
The first in a series on taking great digital photographs in Western Massachusetts, offered by David, owner of Portraits by David
Taking a great digital photograph can be easy if you understand a few important things. First, you must have a camera that allows manual settings if you ever want to produce great digital images. What I mean by manual settings is the ability to control your exposure manually, not relying on the camera to set your exposure. Sometimes you will get a great shot using program mode or shutter and aperture modes, must very seldom will the camera select the correct exposure due to back lighting and other conditions. In future articles, I will discuss ISO, histograms, highlight/shadow etc.

There are two important pieces to exposure, and understanding each one and how it affects the exposure is basic to taking great photographs. They are shutter speed and aperture. Shutter speed is the time of the exposure, or the amount of time the shutter stays open. Aperture is the opening in the lens that controls the amount of light entering when the shutter is open. Unless both settings are set to the correct amount for the lighting condition, your exposure will be off either a little or a lot depending on the ambient light that is lighting the scene and subject.
Consider shutter and aperture this way: A faucet with running water. Turning the faucet on and off is like the shutter, the amount of time it is open would be the shutter speed. The opening the water comes out of is the aperture. The amount or pressure of the water is like the light the aperture lets in your lens. Perfect exposure is the right combination of both. Shutter speed is the time the faucet is open, aperture in the amount or water pressure coming out.
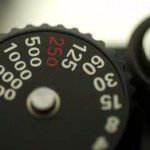 Shutter speeds are times for example, 1 second, ½ second, ¼ second. 1/8 second, 1/15, 1/30, 1/60, 1/120, 1/500, 1/100 second etc.
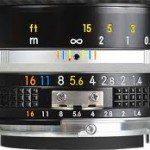
Apertures are called f stops and have the letter f as a prefix, for example f1.4, f2.8, f4, f5.6, f8, f11, f16, f22, f32. A correct exposure is a combination of each of these. Now, you need to know that the larger the f number or aperture, the smaller the hole is that lets light in, and the greater the focus range or depth of field will be.
The longer the shutter speed is for example 1 second, the more time the shutter is open. Tripods should be used at 1/30 and longer shutter speeds to reduce camera shake and blurred images, unless you are real steady or braced well.
Now, let’s look at a sample exposure taken outdoors in direct sun, not the best idea for good photos of people, but ok for landscapes and nature.

Over exposed image

Properly exposed image
I recommend a low ISO in direct sun such as 250 or 300 to allow the shutter and aperture ranges to be able to capture a good image. If you shoot at ISO 800 or 1000 outside in sunlight you may exceed your cameras ability to capture a properly exposed image. Try 1/500 at f11 and see how the image looks, or use a hand held light meter to get a preliminary exposure index. If the image looks too dark, lower your shutter speed to 1/250 and or open your aperture to a lower number like f8, or you can up your ISO to 400
Now let’s look at a photo of a wedding cake with white frosting. One image is over exposed with the detail in the frosting blown out, the second image is properly exposed with details in the frosting and darker areas of the image.

Over exposed whites or highlights
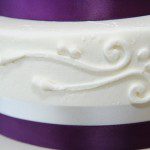
properly exposed with details in both the whites and darker areas of the image
By changing the exposure setting or ISO the photograph is improved. Which one would you want to show to your client?
There are many things that can affect your exposure. Experiment, practice until you feel comfortable with shutter speed and aperture settings, and play with ISO. Next we will look at histograms, your cameras way of showing you if you are spot on or over or under exposed without having to look at a light meter.
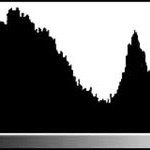
Histogram
Portraits by David | Call us today at 413-537-8137 | Located at 244 Poplar Ave West Springfield, MA 01089 | Hours by appointment.

Leave a Reply